


The tablecloth on our kitchen table is a bit hard to describe. It is setup so that it doesn't hang over the edges of the table so little kids can't grab or pull it. The tablecloth is made of a sheet of clear plastic. The plastic is a little bit bigger than the tabletop, and I sewed a casing around the edge. Inside the casing is a ribbon. By pulling the ribbon tight on the underside of the table, I can tie the tablecloth to the table.
However, the ribbon gets loose and the kids play with the dangling ribbon. I wanted a better solution.
When we went camping last weekend, one of the guys in the group led a class on knot tying. Watching the ropes, I realized that I could use a bit of thin rope or cord to tie the tablecloth. Luckily, Wander has a nice stash of rope that I could peruse, and I picked a length of green polypropylene cord.
To get the cord through the casing, I planned to use the existing ribbon to pull the cord through. After some mistakes attaching the cord to the ribbon, Wander told me that I should use a knot. I remembered the sheet bend knot I learned at camp, because it is supposed to be good for attaching ropes of different thicknesses. Once the ribbon and cord were securely knotted together, it was easy to pull the cord through, and then use another knot to tie the ends.
Showing posts with label homemaking. Show all posts
Showing posts with label homemaking. Show all posts
Sunday, May 31, 2009
Tuesday, April 7, 2009
Apple Chips
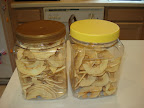
One of the healthier snacks that my girls like is apple chips. They're easy to make (only one ingredient!), store well (no refrigeration required), and super sweet.
Wash, peel, and core the apples. Then slice the apples into thin discs and place them on the dehydrator trays. Set the dehydrator to about 135 degrees and leave the house so you don't have to hear the fan whirring.


Several hours later, remove the dried apple chips and enjoy. I got two small canisters of apple chips out of a five pound bag of apples.

Wash, peel, and core the apples. Then slice the apples into thin discs and place them on the dehydrator trays. Set the dehydrator to about 135 degrees and leave the house so you don't have to hear the fan whirring.
Several hours later, remove the dried apple chips and enjoy. I got two small canisters of apple chips out of a five pound bag of apples.
Tuesday, March 24, 2009
messy mirror
I've had a small mirror on my fridge for several years now. Originally it was just to entertain Sparkle when she was young. Then Glitter came along, and she also liked to look at herself. Recently I realized that Glitter had found a new use for the mirror.
Glitter is a messy eater, but she hates being cleaned up. Now she'll check herself in the mirror and wipe her face and mouth with her napkin until she is presentable. Occasionally we still need to check her, but she usually does a pretty good job.

On similar lines, I've been getting tired of Glitter spilling oatmeal on herself at breakfast. So, this morning I got a napkin and suggested to Glitter that she wear it as a bib. She rejected that idea, declaring that she wasn't a baby. So, I offered a bargain. If she kept clean and didn't spill any oatmeal, she wouldn't have to wear the bib. If she spilled any oatmeal, she would have to submit to the bib/napkin. I've never seen her eat so cleanly! (Side note: after hearing my proposal to her sister, Sparkle tucked her napkin into her dress. Too bad she had already wiped some oatmeal on said napkin.)
Glitter is a messy eater, but she hates being cleaned up. Now she'll check herself in the mirror and wipe her face and mouth with her napkin until she is presentable. Occasionally we still need to check her, but she usually does a pretty good job.
On similar lines, I've been getting tired of Glitter spilling oatmeal on herself at breakfast. So, this morning I got a napkin and suggested to Glitter that she wear it as a bib. She rejected that idea, declaring that she wasn't a baby. So, I offered a bargain. If she kept clean and didn't spill any oatmeal, she wouldn't have to wear the bib. If she spilled any oatmeal, she would have to submit to the bib/napkin. I've never seen her eat so cleanly! (Side note: after hearing my proposal to her sister, Sparkle tucked her napkin into her dress. Too bad she had already wiped some oatmeal on said napkin.)
Monday, March 16, 2009
Sparkle makes salad
Sparkle was hanging out by me when I was making salads for supper. I wondered when she would be old enough to make the salads herself, so I asked her what she thought. She answered, "probably six." I was amused by that. I had assumed that she would say that she wanted to right then, or would give an outrageously old age. Then, of course, a few seconds later Sparkle asked if she could help make the salads right then.
Sparkle pretty much knew what to do, having watched me make salads frequently. (I learned how to make salads from watching Wander's mother.) First you tear the lettuce into pieces into the bowls. Then you cut the veggies, and sprinkle them on top of the lettuce. I guided Sparkle and cringed several times when the knife got really close to her fingers, but mostly just watched. I told Sparkle to think about what each person likes on their salads and how much each would eat: Glitter doesn't eat much lettuce and doesn't like celery; we all like carrot; Glitter really likes cucumber; Sparkle doesn't like tomato.


The chunks of veggies were a bit lopsided, and I cut the tomato myself, but Sparkle's handiwork was pretty good for a first time. I wonder how soon I can turn salad making over to her as a regular chore. (I've already told her that she's in charge of making peanut butter and jelly sandwiches for Friday lunches.)

Sparkle pretty much knew what to do, having watched me make salads frequently. (I learned how to make salads from watching Wander's mother.) First you tear the lettuce into pieces into the bowls. Then you cut the veggies, and sprinkle them on top of the lettuce. I guided Sparkle and cringed several times when the knife got really close to her fingers, but mostly just watched. I told Sparkle to think about what each person likes on their salads and how much each would eat: Glitter doesn't eat much lettuce and doesn't like celery; we all like carrot; Glitter really likes cucumber; Sparkle doesn't like tomato.
The chunks of veggies were a bit lopsided, and I cut the tomato myself, but Sparkle's handiwork was pretty good for a first time. I wonder how soon I can turn salad making over to her as a regular chore. (I've already told her that she's in charge of making peanut butter and jelly sandwiches for Friday lunches.)
Wednesday, March 11, 2009
Paperback Swap Book Wrapping
 I've joined PaperbackSwap to get rid of some old books that we don't want anymore (mostly Wander's old sci-fi) and in exchange get books that we do want (mostly picture books for Sparkle and Chinese textbooks for me).
PaperbackSwap has a way of wrapping a book in a sheet of regular 8.5" x 11" paper, so that you don't need an envelope. Lots of people seem to use envelopes anyway, but I like using the paper wrapper. One problem I've found when receiving a book wrapped in regular paper is that it is difficult to open. All of the seams are taped over, and I don't want to accidentally cut the book. So, when wrapping my own books, I've developed a method to make it easier to unwrap.

I stick a small slip of paper in the seam where the two edges of the paper meet. I label it "cut here to open" to explain the purpose. Then I tape over the seam and the paper slip, making sure to leave the edge of the slip un-taped. That way the recipient can fit a pair of scissors under the slip of paper and cut the wrapper off. I don't know how well the process works, since I've never unwrapped a book myself and none of the recipients of my books have commented on this wrapping method. However, I like the idea and wouldn't it be neat if the idea took off?
Cubed Cheese
Sparkle likes to eat cheese. I usually buy the big brick of cheddar cheese from Sam's Club and cut it myself, because that is cheaper than buying the cheese already cut into cubes. Then I store the cheese cubes in the freezer.
After I buy the big brick, it usually takes me a few days to muster up the courage to tackle the job of cutting it. The task requires the big cleaver, the right size cutting board, a step stool, and lots of plastic wrap.
 Because I'm short, I have to use a step stool to get high enough to push down on the knife to cut all the way through the brick. First, I cut the loaf into 4 or 5 chunks. Then I cut each chunk into slices, then I lay the slices down and cut them into cubes. By the time I'm done cutting, my hands hurt from pressing down on the knife. Finally, I wrap each chunk of cubes in plastic wrap and store it in the freezer.
After I buy the big brick, it usually takes me a few days to muster up the courage to tackle the job of cutting it. The task requires the big cleaver, the right size cutting board, a step stool, and lots of plastic wrap.
Because I'm short, I have to use a step stool to get high enough to push down on the knife to cut all the way through the brick. First, I cut the loaf into 4 or 5 chunks. Then I cut each chunk into slices, then I lay the slices down and cut them into cubes. By the time I'm done cutting, my hands hurt from pressing down on the knife. Finally, I wrap each chunk of cubes in plastic wrap and store it in the freezer.
Sunday, March 8, 2009
Glitter's Third Haircut
One of the girls in our play group has a really cute haircut, which inspired me to cut Glitter's hair. Glitter's hair was looking a bit ragged and thin, and I thought that a hair cut would make it more tidy, and less prone to muck. Glitter wondered if I would cut her hair like Wander's, but I told her that would make her look like a boy.


I used the special hair cutting scissors in the kitchen.


Here's Glitter with her new doo.


It will be a long time before Glitter's hair grows out, but I hope that it will grow out enough for a bun when she is ready for ballet. She had the first haircut before she was one; all her hair was cut. Then her hair got scraggly and I trimmed the back to make her hair more even. This was her third hair cut, and I think that I did a decent job.
Sparkle wanted me to cut her hair too, but I wouldn't because her hair is just getting long enough to easily put into a bun.
I used the special hair cutting scissors in the kitchen.
Here's Glitter with her new doo.
It will be a long time before Glitter's hair grows out, but I hope that it will grow out enough for a bun when she is ready for ballet. She had the first haircut before she was one; all her hair was cut. Then her hair got scraggly and I trimmed the back to make her hair more even. This was her third hair cut, and I think that I did a decent job.
Sparkle wanted me to cut her hair too, but I wouldn't because her hair is just getting long enough to easily put into a bun.
Monday, February 16, 2009
sharpening pencils
Since I started teaching Sparkle, the two of us use pencils as our primary writing utensils. (Prior to that I used pen the few times I used actual paper.)
I have always liked the nice points that the hand crank pencil sharpeners do. I happen to have this colorful pencil sharpener with a suction base. It even has holes to adjust to several different pencil thicknesses. However the suction base doesn't work. I also haven't had any luck finding a hand crank sharpener that uses a clamp at local stores. I finally found a method that works. I repositioned the part of the sharpener that holds the shavings so that there is room for my foot to hold the sharpener still. Then I crank as usual. It reminds me of how I used to use my sewing machine on the floor. (I'm getting old, so it is fortunate that I don't spend hours sharpening pencils the way I used to spend hours on the sewing machine.)

So, until I get an electric pencil sharpener, I guess that I'll be sharpening pencils on the floor. Luckily we have lots of novelty pencils that Sparkle has acquired over the years so that I can sharpen a batch of pencils at once and be done for the week, even considering that Glitter tends to walk off with pencils and "store" them who knows where.
I have always liked the nice points that the hand crank pencil sharpeners do. I happen to have this colorful pencil sharpener with a suction base. It even has holes to adjust to several different pencil thicknesses. However the suction base doesn't work. I also haven't had any luck finding a hand crank sharpener that uses a clamp at local stores. I finally found a method that works. I repositioned the part of the sharpener that holds the shavings so that there is room for my foot to hold the sharpener still. Then I crank as usual. It reminds me of how I used to use my sewing machine on the floor. (I'm getting old, so it is fortunate that I don't spend hours sharpening pencils the way I used to spend hours on the sewing machine.)
So, until I get an electric pencil sharpener, I guess that I'll be sharpening pencils on the floor. Luckily we have lots of novelty pencils that Sparkle has acquired over the years so that I can sharpen a batch of pencils at once and be done for the week, even considering that Glitter tends to walk off with pencils and "store" them who knows where.
Glitter makes her bed
I'm trying to get the girls into the habit of tidying their room each morning. The way our house is setup, their room is just for sleeping - they don't play in their rooms. Sparkle is pretty good at cleaning up and only occasionally needs reminding. Often she forgets because she is so busy hanging out with Glitter and me. Glitter is still in training and needs lots of coaching and help.
Shove the quilt up until no more is dangling!


Get the frog and blankets off the bed. Oops, the frog fell.


Get tigger of the bed. He gets tucked into the quilt.


Make the bed. Lift and smooth the sheets. Thanks mommy for doing the other side!


Shove the quilt up until no more is dangling!
Get the frog and blankets off the bed. Oops, the frog fell.
Get tigger of the bed. He gets tucked into the quilt.
Make the bed. Lift and smooth the sheets. Thanks mommy for doing the other side!
Thursday, February 12, 2009
Book Binding
I love binding my own books. Here are some ways I can bind books. I have lots of methods because there is no single perfect way to bind all books. I choose a binding method for a book based on which features I want: spine, lay-flat, durable, changing pages, and number of pages.
Comb Binding
Simple, quick, easy. The pages lay flat. However, the spine can't be printed, and the pages don't fold back on themselves. This sample book is what I used for teaching Chinese to Sparkle. I chose this binding because I'll be adding pages to the back, but not editing existing pages, and I wanted something that would lay flat.


Sewn Binding
This binding is the closest to a regular book. It takes a while to put together and the pages don't lay flat. However, it is very durable, and it has a spine. This sample book is the reader that Sparkle uses for school. I chose this binding because I wanted the book to be durable enough for daily use for the whole school year.


Pro-Click Binding
This binding is quick and easy and allows for very easy edits. The pages lay flat and can also completely fold back on themselves. This sample book is one I used last semester to study Chinese myself. (I no longer use this book.) I chose this binding because I was swapping out different pages in the middle of the book every week.


Stable Binding
This binding is done with a long-arm stapler. It is quick and easy and fairly durable unless there are a lot of pages. There is no spine. This sample book is just a bunch of pages I stapled so I could get a picture.


Comb Binding
Simple, quick, easy. The pages lay flat. However, the spine can't be printed, and the pages don't fold back on themselves. This sample book is what I used for teaching Chinese to Sparkle. I chose this binding because I'll be adding pages to the back, but not editing existing pages, and I wanted something that would lay flat.
Sewn Binding
This binding is the closest to a regular book. It takes a while to put together and the pages don't lay flat. However, it is very durable, and it has a spine. This sample book is the reader that Sparkle uses for school. I chose this binding because I wanted the book to be durable enough for daily use for the whole school year.
Pro-Click Binding
This binding is quick and easy and allows for very easy edits. The pages lay flat and can also completely fold back on themselves. This sample book is one I used last semester to study Chinese myself. (I no longer use this book.) I chose this binding because I was swapping out different pages in the middle of the book every week.
Stable Binding
This binding is done with a long-arm stapler. It is quick and easy and fairly durable unless there are a lot of pages. There is no spine. This sample book is just a bunch of pages I stapled so I could get a picture.
Saturday, February 7, 2009
Making Milk
Sparkle and Wander and the milk drinkers in the house. They drink powdered milk. (Glitter drinks soy milk, and I don't drink milk.)
Their milk consumption is uneven throughout the week. Some weeks they have a lot of graham crackers and cereal, which uses a lot of milk. Other weeks they drink very little milk. So, using powered milk works for us because I can always mix up a new half gallon of milk on the fly and don't worry about going to the store to get milk, or wasting a gallon of milk because it isn't drunk fast enough.
So here are some pictures of Sparkle, Glitter, and I making milk.


As for the taste - I don't know as I don't drink milk.
Their milk consumption is uneven throughout the week. Some weeks they have a lot of graham crackers and cereal, which uses a lot of milk. Other weeks they drink very little milk. So, using powered milk works for us because I can always mix up a new half gallon of milk on the fly and don't worry about going to the store to get milk, or wasting a gallon of milk because it isn't drunk fast enough.
So here are some pictures of Sparkle, Glitter, and I making milk.
As for the taste - I don't know as I don't drink milk.
Thursday, February 5, 2009
Cookie Press
I got this cookie press as a gift many years ago. I like to make sugar cookies with it. Our homeschool group will have a Valentines party tomorrow, so I decided to make red heart shaped sugar cookies with the cookie press. I really like how easy it is to make consistently sized, small cookies with the cookie press.
I started the cookies after finishing school with Sparkle in the afternoon. I mixed the sugar cookie dough in the stand mixer and added red food coloring. Then I put the dough in the fridge to chill. Then it was time to pick up Glitter from preschool. I didn't get back to the cookies until after the girls were in bed.
Pressing out the cookies.

A sheet of cookies ready to go in the oven.

A sheet of cookies after baking.

Cookies ready to go.

I started the cookies after finishing school with Sparkle in the afternoon. I mixed the sugar cookie dough in the stand mixer and added red food coloring. Then I put the dough in the fridge to chill. Then it was time to pick up Glitter from preschool. I didn't get back to the cookies until after the girls were in bed.
Pressing out the cookies.
A sheet of cookies ready to go in the oven.
A sheet of cookies after baking.
Cookies ready to go.
Subscribe to:
Posts (Atom)